Good Clean Fun – Part 2
In a previous post – I mentioned the Channels server (CS) that I installed to act as a media hub that serves tv shows and movies in my house, and it is also accessible from the internet. 😁
I’m glad God gave me the ability to work with technology, if it wasn’t for him, I wouldn’t be able to do anything – the truth is Jason (me) is nothing without God…
A lot of people, are arrogant because of some ability they have whether it be singing, sports, or some other talent. The truth is your ability is God given and without that, you couldn’t have worked for it or learned it. We owe everything to God!!!
Unfortunately I don’t have a lot of storage on my CS, like maybe 1TB or a little more – which really is nothing. I don’t need a massive amount of storage but I need way more than 1024 Gigabytes – that’s for sure.
I’m also trying to save money – not that I care much for money – its great to have but for me right now its more about being responsible and making the most of what I have – its a lifestyle, I’m not frugal by any means, I just think being thoughtless about how I spend money is stupid. Also, I’m not being smart if I don’t take stock of what I have and not looking into if I can make something out of spare parts.
I cannibalized an old deprecated backup unit and got two 4TB drives out of it, and since its not a critical use case (my media storage ultimately is not that important in the scheme of life) but I still want to put something in place for now. I’ve decided to do raid 0 (aka disk striping) across the drives to get an total of 7.x TB of storage, once it’s all said and done. Here is a basic configuration that gives us a simple way to add some storage with just a spare PC and some drives… I’m limited to 3 because my server only has 3 SATA ports and I’m just using what I have available at hand.
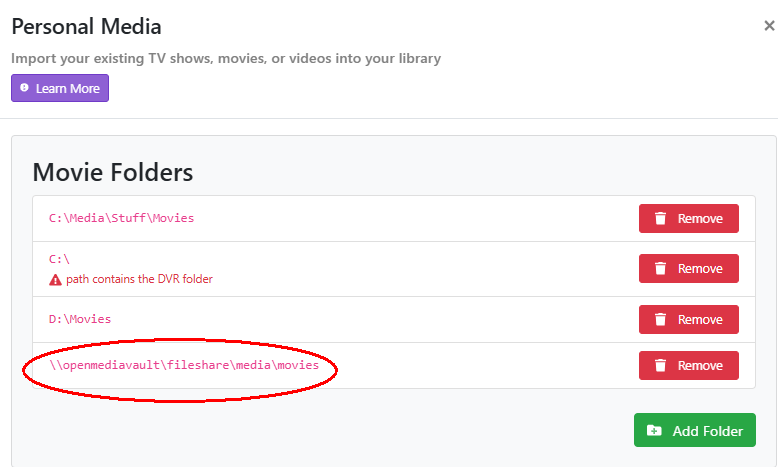
So the first thing was to install the old stable version of Open Media Vault (OMV). I downloaded the .ISO image and wrote it to an external USB stick using RUFUS. Every PC when it boots up has a UEFI or system BIOS that can be configured to boot from a USB device – (so you need to find out how to change the boot sequence for your system – you may also have to turn off the secure boot setting if set, and then insert the USB stick and boot off of it for the installation to the internal hard drive of the OMV server) – then I installed OMV on a spare 1TB drive and used DHCP to set the address on the internal interface, I’m not using a static IP or a reserved DHCP address because in the CS – I’m using a Universal Naming Convention (UNC) path as a way to point to the storage server – this way the DHCP lease can expire on the client and it doesn’t matter because I’m pointing to the host name and it will be found using a local discovery protocol mechanism such as mDNS (multicast DNS) or LLMNR (link local multicast name resolution). (see image below).
Once you’ve installed OMW – you will see an IP address on the console (provided you are plugged into an ethernet port) and
- from a browser – using the IP – log into the web GUI of the OMV..
- [storage/disks] – once there you can find the external large disks – wipe them
- [system/plugins] – install the OMV Linux MD (Software RAID) plugin
- [top right corner – power icon] – reboot
- [storage/multiple device] – create a single large volume from multiple disks
- [storage/file systems] – format the volume with the EXT4 file system
- [storage/shared folders] – create a shared folder as a pointer to the device e.g. fileshare -> /dev/md0
- [services/smb-cifs] – expose the shared folder to the network stack via the SMB/CIFS service.
Remember, you will also have to apply the change(s) with every change you make in OMV. And now you can see I’ve added the storage below with takes the burden of storage off the CS and puts in on the Open Media Vault!

I hope this will help someone – if you have any configuration questions, let me know!
Jason